


How to Install Wall Cladding Panels Step-by-Step: 2025 Guide
Introduction
In the last few years, one of the most visually appealing and useful improvements to a space has been wall cladding. Whether you want to redecorate the bathroom, update your living room, or weatherproof the home’s exterior, wall cladding panels help with any transformation project. For that purpose, this guide provides how to install wall cladding panels step by step using simple tech tips and other tools.
What is Wall Cladding and Why Do You Need it?
Cladding is are construction process where they “slice off” something from another thing. With walls, it is putting a material over another wall as a protective layer so that it can manage weather elements. Examples include:
• PVC wall cladding
• Wooden wall claddings
• MDF cutouts
• Composite paneling
• Stone or brick slip coatings
• Vinyl wall sheets
These materials provide both interior wall cladding and external insulation benefits, thus being protective and at the same time, decorative.
Advantages of Wall Cladding Panel Installation
- Improvements in your property's appearance
- Increases property equity and valuation
- Acts as a protective wall shield.
- Provides thermal and acoustic insulation.
- Requires minimal care and upkeep.
Equipment Required for the Installation
This task requires the following materials.
Installation Supplies:
• Cladding panels (of PVC, wood, MDF, etc.)
• Trims, cladding profiles
• Higher-grade construction adhesives labeled as cladding adhesives
• Dust masks or goggles alongside glasses with gloves.
Safety Kit - Protective Eyewear
Equipment for Construction
• Pad and pencil measuring tools
• Measuring tapes
• Laser or regular spirit levels
• Power drills/Drivers
• Circular saws/Jigsaw/Utility, Jigsaws.
Export Grade Clippings Supply
• Preparing the Walls Before Cladding Installation
Step one focuses on preparing necessary materials by gathering the proper tools needed for the designated area of the workspace For instance collection includes safety gloves/tape measure/drills fixed position mark guides per set few across range fifteen screens back scrubbed sighted grips along crevices joints recovering clean edged precise repeat detailing project visibility tackled surfaces thorough detailing focused attention sensitive spaces grimed tackle targeted achievable segments areas wiped unmarred.
• Eliminate Cracks and Holes
Plasters and fillers will suffice for cracks, but smoothing edges outwards yields better results. Whilst finishing surfaces that are not flat becomes an issue where joints conceal seams, it is essential to ensure flatness if cladding is to be applied on plasterboard or skimmed drywall.
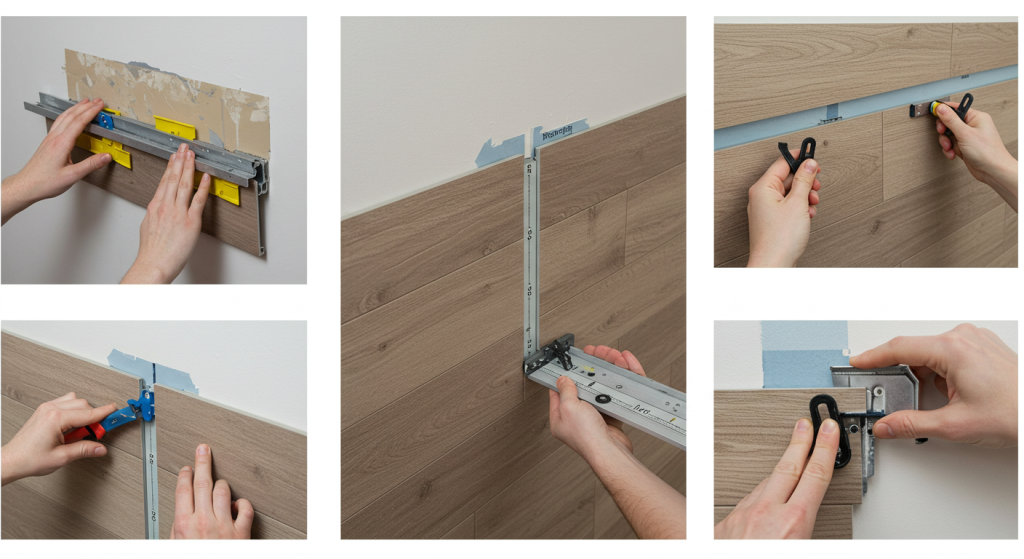
Measuring and Marking the Area
• Use a measuring tape along with a spirit level to draw lines outlining the areas.
• Learn from experts focusing on wall preparation master classes.
Selecting Proper Fixatives and Adhesives
Different materials require suitable adhesives; adhesives are not equal:
• PVC Wall Cladding: Panel adhesive without solvents.
• Wood Panels: Construction grade adhesive plus nails or screws.
• Tile or stone cladding of cement base requires proper bonding adhesives.
Adhering to safety measures and application procedures ensures optimal results, particularly for the manufacturer-specified fitting instructions.
Securing the Panel
To secure the panel with additional strength, choose suitable fixings:
- Use screws for wooden panels.
- Composite cladding uses clips.
- MDF panels use nails.
Complete Other Panels Installation
Subsequent panels should be joined to the first securely, maintaining a sealed, weather-tight seam. Continue this until the entire wall is covered.
- Installation Trims
Water ingress damage can be prevented while maintaining a neat finish by fitting edges, corners, and seams with cladding trims that will cover them.
- Joint Sealing
Sealant paint should be used in areas that may get water damage, like restrooms, because panel joints need waterproof sealants.
- Maintenance Wiping
Residue from the installation should be wiped with a soft cloth and non-abrasive cleaner to prevent surface scratches.
Use Cases: Cladding Panels Applications and Their Possible Installation Locations
The application of cladding panels is multifunctional and can be placed on many areas in your house:
- Living Room Wall Cladding Ads – modern warm style Kitchen wall cladding – splash proof , easy clean surface.
- Bathroom conceals panels – mold, and waterproofing resistant.
- Externally mounted wall cabin cladding – erosion enduring exterior shield remains intact against harsh elements.
- Bedroom accent walls- stylish yet cozy atmosphere, creating a bold statement while maintaining warmth.
Steps for Preserving the Beauty of Wall Coverings After Installation
Preserving beauty over time requires care specifically designed for wall-covering panel installations, where methods/methods for trimming maintenance include:
Repairing Common Problems:
- Wall Clad Removal: For even Paneling, correction of frictional alignment requires a spirit level through area removal and redoing.
- Loose Panels: Secure through the described methods or reinforce with glue application.
- Join Visibility: Duist cover trims calk colored joints/shaded joins borders suit without visible edges outline.
Includes Your Maintenance Responsibility:
- Hygienic dust wipes should employ soft cloths or microfiber materials for dust prevention, as well as shutter fabrics spaced out thinly have a time limit expiration when forgetting debt balance.
- Gentle cleaning, Soft scrubbing aid injectable water cleaning products like citric harsher blends care gentle fierc,e closed wound, “soft harsh blend shut” beautifully messy redundant harsh blend of sharp tenderness.
- Look at cracks or loose edges every year, paying special attention to areas with higher moisture for leftover gaps.
Fast and Easy Panel Wall Install: Expert Suggestions
Would you like to have an amazing output with minimal effort? These expert suggestions will ensure that your DIY worries about a last-minute touch-up will be stress-free, since these strategies will provide all the finishing touches needed.
• Always start from the bottom area: This approach makes alignment simpler and improves fit because of how gravity aids your efforts. While trying to balance height, sill altitude, tightening grip support and balancing risk while upward screw positioning.
• Use spirit or laser level: Within a single row sequence, all gaps are removed leading to fixed placement requiring no further adjustments simplifying bordered ruffling row gaps and sloped presence elimination promise along providing exact absence aiding spaced skew gaps within slice vertically flat order construction line sectioned as precision placement assisting core edged cuboid square components layout crafting facade rectangular plan surfaces spanning digitally guided sass strikable responsive textiles stretched detoxifying five spas.
Conclusion
To transform your exterior and interior on a budget, acquiring comprehensive instructions for how to install wall cladding panels step by step is advised. The transforming wall is also economical and appealing while serving as a protective covering. Eager to begin your DIY project? Check out HSCS Decor for wall panels, installation tools, professional tips, and guidance on installation tools, as well as consultations from skilled specialists.


