


DIY PVC Wall Panel Corner Trim Installation: Step-By-Step Guide
Contents
HSCS
1
PVC Wall Panel Fitting: A Full Guide for 2025
PVC Wall Panel Fitting: A Full Guide for 2025
Do you want the walls in your kitchen or bathroom to have a professional and waterproof finish? Well, you are in luck because in this deep-dive guide, we will show you how to do DIY PVC wall panel corner trim installation by explaining every detail from selecting the correct trims to final touches in sealing and finishing so that everywhere you look, your project appears polished, Professional, effortless, and flawless.
Why is it Important to Use the PVC Wall Panels Corner Trims?
The importance of corner trims must not be overlooked because they add elegance as well as play an important role when it comes to functioning aspects in any wall panel installation project, be it a bathroom, kitchen, or a utility room because These trims accentuate the appearance of panels while making sure they function perfectly too.
1. Closing Up Internal and External Corners
Well done internal and external corner fittings with rounded edges done on PVC edges provide watertight seals at weak joints, quite literally covering gaps between pans, which water can creep into around behind panels.
2. Preventing Water From Entering
Some areas like showers or sinks are prone to moist conditions due to the presence fan water supply, thus leading to repeated exposure over time while damaging walls and the surrounding structure beneath them. This is where smoke corners come into play, creating watertight seals allowing for no future damage, completing substructure protection for the structural integrity of panels forever.
3. The Function of Concealing Panel Borders and Joints
The trims that are made for corners mask cut edges and the wall seams, which provides a polished look to your installation, devoid of gaps or rough edges.
4. Durability, Which is Long Term and Sturdy:
Secure trims effectively help bolts and panels Dow, ensuring they do not shift, causing wear and tear due to the expansion or contraction as a result of humidity or temperature changes.
Tools & Materials Needed:
Before commencing on your DIY Hinged PVC Wall Panels 2020 trim installations, please get the following tools ready:
● Accurate Angled Cuts – Miter Saw / Fine Tooth Handsaw
● Trimming Small Sections – Utility Knife
● Measuring tape with Pencils
● Adhesives for wall trim made up of PVCs (waterproof construction adhesive or any solvent-based adhesives)
● Portable Caulking Gun
● Joint Silicones that are waterproof (for silicone joints)
● Spirit Level
These will ensure the installation is clean and persistent over time, portably.
Selecting Your Corner Trim Made Of PVC with Curvature
1. Internal Corner Trim
It is suitable for 90-degree outward inside angle intersection borders where two elements meet at a right angle, e.g., shower cubicles and bathroom walls.
2. External Corner Trim
Most appropriate for outer corners or where two walls form a projecting edge.
3. End Cap Trim (Edge Trim)
Completes the edge of a paneling section that is open on one or more sides, as well as at the top or bottom.
4. H-Trim (Joiner Trim)
Connects two panels in a straight run and maintains a flat alignment between them.
5. Quadrant or Cove Trim
Used ornamentally and structurally for two planes meeting vertically at an angle; notably between ceilings and upper walls.
All these elements serve specific purposes within the framework of a comprehensive DIY wall paneling project.
Step-By-Step Instructions: Installing Corner Trim of PVC Wall Panels
The task of installing PVC wall corner trims can appear complex, but it becomes straightforward if you follow the outlined steps. Below are professional tips to achieve consistent, polished results and DIY PVC wall panel corner trim installation.
Step 1: Wall Surface Preparation
Ensure that surface walls, before starting, are uncluttered and clean.
● Scrub to remove all dust, grease, old glue marks, and blemishes on the surface walls.
● Apply filler on any visible gaps, holes, or rough surfaces flush so they don’t alter resultant trim angles/lines.
● For existing tiles that have been set previously, make sure none of the tiles are broken/loose before proceeding.
● The surface should be adequately dried before undertaking these procedures.
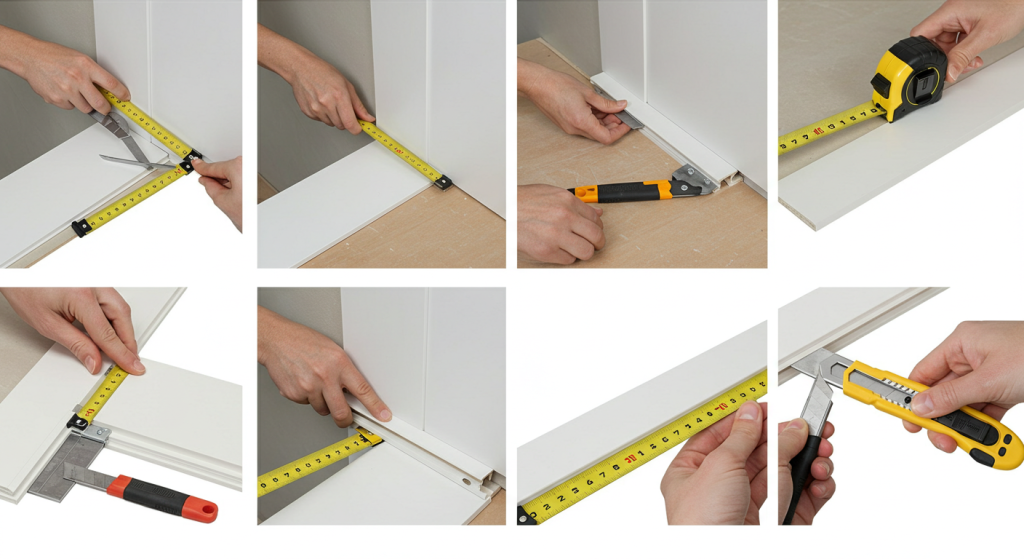
Step 2: Measuring & Cutting
Perfectly fitting trims begin with accurate cuts; this stems from proper trimming measurements.
● The biggest measurement is taken first by measuring height concerning the margin corners where trim pieces get fixed together.
● Piece outlines are drawn onto respective cutouts using a pencil alongside squares for sharp corners, without excess markings on edges once trimmed out correctly.
● Use a fine-tooth miter saw or sharp utility knife to cut for a smooth edge finish.
● Before applying any glue, perform dry-fitting for every trim to confirm the measurements.
Step 3: Applying Adhesive
The adhesive should be strong enough to securely hold the trim in place.
● PVC-compatible Construction adhesive can be used on the back of trim as spacer blocks.
● Application should be uniform and done with a caulking gun.
● Push the trim firmly into position after application.
● Pro tip: while the adhesive is curing, use painter's tape to temporarily secure trims in the correct positions
Step 4: Installing the PVC Panels
It is now time to put in the panels.
● Corners of the trims have grooves where panel edges can be inserted; please do so.
● Give adhesive onto each of those backsides, please.
● Hold panels over their respective places.
Step 5: Sealing Joints
- Waterproofing is very important.
- Draw a bead of sealant silicone around all trims and corner joints.
- Use your finger, wet, or you may use sealant tools to smooth it out.
- This will lock moisture removal while maintaining aesthetic cleanliness, which gives long long-lasting gloss finish.
Expert Suggestions for Optimal Results in the Installation of PVC Corner Trim
Installing PVC wall panel corner trims is an easy job provided you follow the necessary steps. To achieve the best results with durability and beauty, consider these expert recommendations while conducting your DIY project.
1. Store Panels Flat Before Installation
Always store your PVC panels and trims flat and indoors. Keeping them upright and exposed to sunlight can cause warping, especially in humid conditions.
2. Mind the Temperature
Do not install at temperatures below 10°C (50°F). Cold conditions make PVC brittle, while an adhesive’s effectiveness is reduced during cold weather. If possible, work within a temperature-controlled environment.
3. Perfect You’re Outside Trim Cuts
External trims should be cut using a miter saw at 45-degree angles to create sharp outside joints that enhance both aesthetics and strength.
4. Waterproof Like a Pro
With particular emphasis on corners located in bathrooms, kitchens, or wet rooms, apply high-quality silicone sealant. This prevents molds, leaks, as well as water damage over time.
5. Don’t Skip the End Trims
Besides being aesthetically pleasing, end trims are essential for sealing the edges of panels to guard against chipping or moisture ingress.
Why HSCS PVC Corner Trims?
Here at HSCS Decor, your corners will always match the panels, which is ideal for every vying PVC wall trim corner panel installation.
Whether it is a bathroom remodel, an updated laundry room, or even a kitchen backsplash renovation on splash-proof accents, HSCS Decor’s trims always provide accent solutions tasked hard towards amazing visuals while being practical and fully usable.
Our Trims are:
- 100% Waterproof & Mold resistant – Constructed to withstand high moisture conditions.
- Easy and Flexible Installation –works well in tight spaces, curves, and corners.
- Modern Styles & Finishes Available – is available in matte and high gloss to blend with your décor.
- All Standard PVC Wall Panels Are Supported – as it was made for them, gaps will be avoided and seamless integration achieved.
Every DIY PVC wall panel corner trim installation is molded to provide a snug fit along with clean seams that increase durability while providing the panels a refined, professional look. Moreover, they give long-term protection by decreasing maintenance efforts.
Conclusion
Any space could be transformed with the right tools and materials alongside proper instruction, achieving an effortlessly polished look. The corner trims serve important functions: waterproofing, aesthetics, as well as resisting old age wear and tear of use, enabling a longer life span and sturdiness. HSCS provides quality products with expert support for any projects, be it bathroom renovations or new wall paneling endeavors. Begin your project today using HSCS Décor's best trims and panels together.


