


How to Install Foam Decorative Wall Panels
Learning how to install foam decorative wall panels is one of the fastest, easiest, and most affordable ways to add a 3D textured feature wall to your home. These panels, often in "peel-and-stick" form, can create the look of brick, wood, or stone in just a few hours.
This is a project that almost any beginner can tackle. But the difference between a "DIY" look and a professional, seamless finish comes down to a few key details: wall preparation, layout planning, and how you finish the seams.
This guide is built from real-world experience. I have installed these panels, and I have made the common mistakes so you do not have to. We will cover the complete step-by-step process, the tools you need (and do not need), and the critical safety rules you must follow.
What Are Foam Decorative Wall Panels?
Foam decorative wall panels are thin, lightweight, flexible tiles used for covering interior walls. They are typically made from PE (polyethylene) foam. They have a 3D embossed front surface to mimic materials like brick or wood, and a self-adhesive "peel-and-stick" backing.
These are cosmetic panels. Their only job is to change the look of a room. They are very popular for creating accent walls, covering up old or damaged drywall, or for use in rental properties. They are sold under many names, like "3D foam wall stickers" or "peel-and-stick brick panels."
What Is the Difference Between Decorative Foam and Rigid Insulation?
This is the most important fact to understand. These thin, 3D foam panels are not insulation. They are a decorative skin. They offer almost zero thermal or acoustic (sound) benefits.
- Decorative Foam: Thin, soft, lightweight, and flexible. It is for looks. This is what our article is about.
- Rigid Foam Insulation: Thick, dense, rigid boards (like XPS or Polyiso). These are thermal foam wall panels designed to be a structural, energy-saving material.
I have seen many online listings for decorative foam that claim they "save energy" or "block sound." This is just not true. A 1/4-inch soft foam tile has less R-value than a piece of cardboard. If you need real insulation, you need a real insulation product. You can learn more in our main guide on foam wall panels & insulation.
What Are the Benefits of These Panels?
The main benefits are that they are cheap, extremely easy to install, and require no special tools. You can cut them with scissors. They are lightweight, flexible, and can be installed by one person in an afternoon as a DIY project.
Here is a quick breakdown of the main advantages:
- Cost-Effective: A very low-cost way to get a high-impact look.
- DIY-Friendly: No special skills are needed. If you can use scissors, you can do this.
- No Mortar, No Grout: You get the "brick" look without the mess.
- Lightweight: Easy for one person to handle.
- Fast: You can transform an entire room in a day.
- Covers Blemishes: They are great for hiding ugly paint, small cracks, or a slightly textured wall.
What Are the Downsides You Must Know?
You must be honest about what this product is. The downsides are that they are not durable, they are not truly waterproof, they can be hard to remove, and they have critical fire-safety rules.
- They Are Not Durable: This is their biggest weakness. The foam is soft. A chair bumping it, a pet scratching it, or a child playing can easily dent or puncture it.
- They Are Not "Real": Up close, you can tell it is foam. It is a decor "fix," not a high-end architectural material.
- They Can Be Hard to Remove: The "peel-and-stick" adhesive is strong. When you remove the panels, they will almost certainly peel off your drywall's paper layer, requiring you to repair the wall.
- They Are Not Waterproof: The plastic surface is water-resistant, but the seams are not sealed. Do not use them in a shower.
What Tools and Materials Will I Need?
You do not need a lot. This is one of the project's main attractions. You are not mixing mortar; you are just cutting and sticking.
Your Tool & Material Checklist
- Foam Panels: (Buy 10-15% extra).
- Scissors: A good, sharp pair of heavy-duty scissors is often all you need.
- Utility Knife: For very straight cuts or for cutting around outlets.
- Tape Measure: Essential for planning.
- Level: A 4-foot level is best. A laser level is even better.
- Pencil: For marking.
- Cleaning Supplies: TSP (Trisodium Phosphate) or a good degreaser, plus clean cloths.
- (Optional) Paintable Caulk: This is my "pro-secret" for a perfect finish.
- (Optional) Construction Adhesive: If your panels are not self-adhesive.
What If My Panels Are Not "Peel-and-Stick"?
If you bought panels without an adhesive backing, you must use a construction adhesive.
- The Wrong Glue: Do not use a solvent-based adhesive (like some "liquid nails"). The solvents can melt and "eat" the soft foam, causing it to warp or fail.
- The Right Glue: You must use a "foam-safe" construction adhesive or a standard "all-purpose" latex-based adhesive. Check the tube's label to make sure it is safe for polystyrene or foam.
How Do I Plan My Foam Panel Installation?
Planning is what separates a good job from a bad one. Do not just start in a corner and start sticking. Your walls are not perfectly square. If you start in a corner, your lines will be crooked by the time you reach the other side.
How Do I Calculate How Many Panels to Buy?
This is a simple, two-step process.
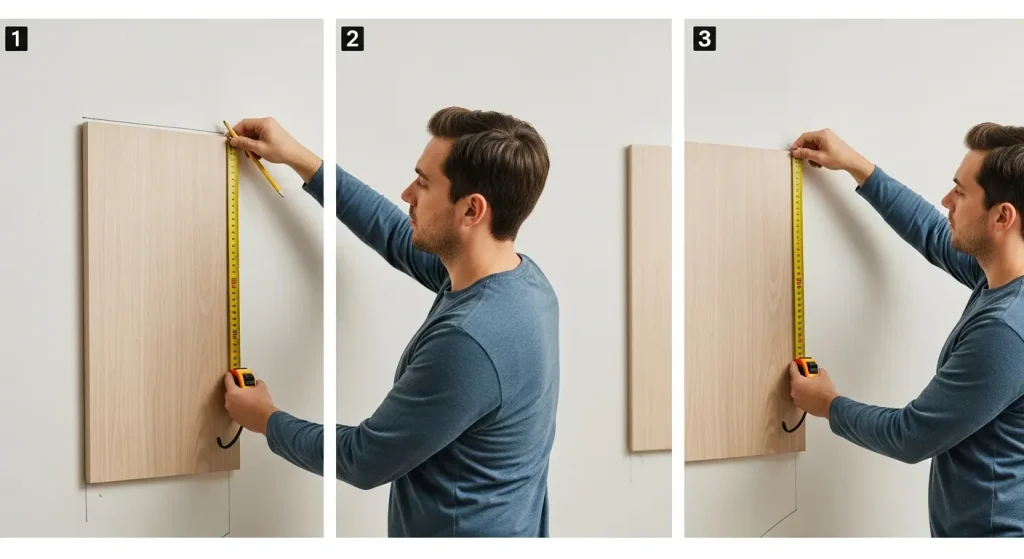
- Measure Your Wall: Get the total width and the total height of the wall.
- Calculate Square Footage: Multiply Width (in feet) x Height (in feet) = Total Square Feet.
- Buy Extra: Always buy 10-15% more than your total. This is your "waste factor." You will need this extra for cuts, corners, and mistakes.
There is nothing worse than being two panels short of finishing. Always buy the extra.
How Do I Prepare My Wall for Installation?
Your wall must be 100% clean, dry, and smooth. The peel-and-stick adhesive will not stick to dust, grease, or a damp wall. This is the single most important step for a lasting installation.
Why? The adhesive stuck to the micro-layer of dust on the wall, not the wall itself. I had to pull them all off.
The Pro-Prep Method:
- Turn off the power to any outlets on the wall.
- Remove all outlet covers and switch plates.
- Clean the wall with a real degreaser. I recommend a TSP (Trisodium Phosphate) solution or, at a minimum, a strong soap and water.
- Rinse the wall with a clean, damp cloth.
- Let the wall dry completely. This can take a few hours.
Can I Install Foam Panels Over Textured Walls?
Yes, but with a condition. A light texture (like "orange-peel") is usually fine. The foam is flexible and will stick.
A heavy texture (like "popcorn" or "knockdown") is a problem. The adhesive will only be touching the "high spots" of the texture. It will not get a good bond and will likely fail.
For a heavy texture, you have two choices:
- Scrape or sand the texture smooth (a very messy job).
- Install the panels with an extra layer of construction adhesive to fill the gaps. This is a better option.
Can I Install Them Over Existing Tile?
Yes. As long as the tiles are clean, dry, and not falling off the wall, the panels will stick to them very well. This is a great, fast way to cover an old tile backsplash.
How Do I Plan My Layout? (The Pro-Tip)
Do not start in a corner. Start in the center. This is my number one tip for a professional look. Your home's corners are almost never a perfect 90-degree angle. If you start in a corner, your "brick" lines will be visibly slanted by the time you reach the other side of the wall.
The "Center-Out" Method:
- Use your tape measure to find the exact horizontal center of your wall.
- Use your level to draw a perfectly vertical (plumb) line from the ceiling to the floor at that center mark.
- This line is your starting point. You will line up the edge of your first panel (or the center of it) with this line.
- You will then work your way out from this line, toward the corners. This ensures your pattern is perfectly level in the middle of the wall (where your eye goes). The tiny, out-of-level cuts will be in the corners, where they are almost invisible.
How to Install Foam Decorative Wall Panels (Step-by-Step)
Here is the complete, start-to-finish process.
Step 1: Clean and Dry Your Wall
This is your most important step. As we covered, clean the wall with a degreaser (like TSP) and let it dry completely.
Step 2: Mark Your Centerline
Find the horizontal center of your wall. Use your level to draw a perfectly plumb vertical line. This is your guide for your first panel.
Step 3: Test-Fit and Cut Your Panels
Before you peel anything, plan your first few panels.
- If you have an outlet: Hold the panel up to the wall (do not stick it). Trace the outline of the outlet box onto the front of the panel with your pencil.
- Cutting: Use your sharp scissors or utility knife to cut out the hole. It is better to cut a little less than you think. You can always trim a bit more off. You cannot put it back.
- The "Brick" Pattern: If you are using "brick" panels, you must offset them. This is called a "running bond." This means the panels in the second row will be "halfway" shifted.
- You will need to cut your first panel in half to start the second row. This is what creates the staggered, realistic brick look.
Step 4: Peel and Stick the First Panel
This is the moment of truth.
- Take your first panel. Peel back just a few inches of the paper backing from the top. Do not peel the whole thing.
- Line up the edge of the panel with your vertical centerline. Use your level one last time to make sure the panel itself is level.
- Press the exposed sticky top edge to the wall.
- Once it is in place, slowly pull the rest of the paper backing down and away, while smoothing the panel onto the wall with your other hand. This prevents bubbles.
- Press firmly over the entire panel, especially the edges.
Step 5: Install the Remaining Panels
Now you just repeat the process.
- Take your next panel.
- Align the "brick" or "wood" pattern with the first panel.
- Peel and stick.
- When you start your second row, use the half-panel you cut to create the staggered offset.
- Continue this process, working your way out from the center.
Step 6: How to Finish Corners and Edges
You have two ways to handle a corner.
- The Easy Way (Overlap): Just let one panel overlap the corner and stick it. Then, stick the next panel on the other wall right up to it. It creates a "seam" but is fast.
- The Pro Way (Caulk): This is my preferred method. Stop the panels on both walls about 1/8-inch before the corner. This leaves a small, clean gap.
- Then, take your paintable caulk and run a perfect, smooth bead from the ceiling to the floor.
- Smooth it with a wet finger.
- When you paint the caulk to match your panels, the seam disappears. It looks like a single, solid, custom-built corner.
This same caulk trick is perfect for hiding the seams between panels. A tiny bead of caulk, smoothed flat, can make your wall look much more realistic.
Common Problems and Pro-Solutions
Here are the questions I get asked the most.
Why Are My Foam Panels Peeling Off?
There are only two reasons:
- Your wall was not clean. The adhesive is stuck to dust, not the wall.
- The wall is damp or has high humidity. The panels will not stick to a wet wall (like a basement that has water issues).
How Do I Hide the Panel Seams?
The "pro-caulk" method is the best. A bead of flexible, paintable caulk in the seam, smoothed with a finger, will make it vanish, especially after painting.
Can I Paint These Foam Panels?
Yes, and you probably should. The "out of the box" finish can look a bit shiny or "plasticky." Painting them makes them look much more realistic.
- What Paint to Use: Use a water-based (Latex) paint. A matte or eggshell finish looks best.
- What Paint to AVOID: Do not use solvent-based or oil-based paints. The solvents can damage the foam.
- How to Paint: Use a roller for the flat areas and a brush to "pounce" and get into the 3D "grout" lines.
Are These Panels Waterproof?
No. They are "water-resistant." The plastic surface is fine. But the seams and the adhesive backing are not waterproof. You can use them on a bathroom wall, outside of the shower. You can never use them inside a shower or a tub surround. If you need a 100% waterproof solution, you need a real waterproof foam wall boards system or a PVC panel.
Are Decorative Foam Panels a Fire Hazard?
Yes. This is the most important safety rule. These panels are plastic. They are combustible. They burn fast and can release toxic smoke.
- You must NEVER install these near a source of high heat.
- Do not put them behind a stove.
- Do not put them near a fireplace.
- Do not put them near a furnace or water heater.
- Check your local building codes. In many areas, these are not permitted in commercial-use spaces (like a restaurant) because of their low fire rating.
How Do I Remove Foam Wall Panels?
This is the hidden "cost" of the project. The strong adhesive will rip the paper face off your drywall.
- Start at a corner and pull.
- It will be a mess. The panel will tear. The drywall paper will rip.
- After they are all off, you will be left with a wall covered in torn paper and sticky adhesive residue.
- You will need to scrape, sand, and then apply a "skim coat" of drywall mud to repair the wall before you can paint it.
Be aware of this. This is a great temporary fix, but the removal is a real job.
Are Foam Panels a Good Choice for My Home?
Yes, as long as you know what you are buying. You are buying a fast, cheap, and easy cosmetic upgrade. You are not buying a durable, long-term, high-performance building material.
For an accent wall in a bedroom, a living room, or a rental, they are a fantastic, high-impact project. For a high-traffic hallway, a kid's room, or a damp basement, they are the wrong choice.
When you install them, take your time with the prep and the layout. A little extra planning will give you a wall that looks great for years.


