


How to Install WPC Wall Panels Step by Step: A Pro Guide
WPC (Wood-Plastic Composite) wall panels can completely change a room.1 They add texture, warmth, and a high-end architectural feel. The best part? They are one of the most DIY-friendly upgrades you can do. This guide on how to install wpc wall panels step by step will walk you through the entire process.
As a designer and installer, I have put up countless WPC walls. I have also seen the common mistakes that frustrate first-timers. This is not just a list of steps. This is a complete workflow, packed with the pro-tips and "what-if" solutions you will need. We will cover planning, tools, and the hidden details—like how to get a balanced layout and how to work around outlets.
With the right preparation, you can achieve a flawless, professional finish in a single weekend.
What Are WPC Wall Panels?
WPC wall panels are an engineered building material made from a mix of wood fibers and plastic.2 This composite is heated and formed into panels. Most WPC panels designed for interiors use an interlocking tongue-and-groove system. This means each panel slides into the next, creating a seamless look.
This interlocking design is the key to why they are so easy to install. You do not need to be a drywall or plaster expert. The system is designed to hide fasteners, giving you a clean finish. This makes them a popular choice for accent walls, media centers, and bathroom upgrades. For a complete overview, see our WPC wall panels guide.
Why Choose WPC for a DIY Installation?
WPC panels are very DIY-friendly because they are lightweight, clean to cut, and use a simple interlocking system.3 Unlike finishing drywall, there is no messy mud, sanding, or dust. Unlike tile, there is no grout or wet saw needed. It is a dry, fast installation.
The main benefits for a DIY installer are:
- Speed: A typical accent wall can be done in one day.
- No Mess: Cutting WPC (with the right blade) is clean.4
- Simple System: The tongue-and-groove design is forgiving and intuitive.
- Durability: Once it is up, it is done. It is a waterproof and durable finish that resists scuffs and moisture. You are installing the final finish from the start.
Before You Begin: Is Your Wall Ready for WPC?
Your wall must be clean, dry, and reasonably flat. Minor imperfections are usually fine, as the panels will bridge them.5 But you cannot install over large holes, crumbling plaster, or peeling wallpaper.
This is a critical first check. From my experience, 90% of installation problems start with a poorly prepared wall.
What Surfaces Can You Install WPC Panels Over?
- Drywall (Painted or Unpainted): Yes. This is the ideal surface. If the paint is very glossy, I recommend a light scuff-sanding with 120-grit sandpaper. This gives the construction adhesive a better grip.
- Plaster: Yes, if it is in good condition. If the plaster is old, soft, or crumbly, you must install battens first.
- Wallpaper: No. Never install over wallpaper. The adhesive on the WPC will pull the wallpaper off the wall, and your panels will fail. You must remove all wallpaper and adhesive residue first.6
- Ceramic Tile: Yes, but you must install battens. Do not try to glue WPC panels directly to the tile. The adhesive will not bond properly, and the grout lines create an uneven surface.
- Brick or Concrete Block: Yes, but you must install battens. These surfaces are too uneven and porous for a glue-on application.
How Flat Does the Wall Need to Be?
The wall needs to be flat, but not "glass-smooth." The panels are rigid and will hide most small bumps or waves in the drywall.
- Pro-Tip (The Level Test): Take a long, straight level (4 feet or more) and place it against the wall. If you see any gaps larger than 1/4 inch, your wall is too uneven.
- How to Fix It: For high spots, sand them down. For large dips, you can either fill them with joint compound or, the easier way, plan to use battens.
Step 1: Planning and Preparation
Good planning is more important than speed. Do not open a single box of panels until you have completed this step. This is where you calculate your materials, gather your tools, and make a game plan.
What Tools Do You Need for WPC Panel Installation?
You need basic measuring, cutting, and fixing tools.7 You likely have most of them already. Having the right tools makes the job fast and clean.
| Tool Category | Required Tools | Pro-Tips & Recommendations |
| Measuring | • Tape Measure • 4-Foot Level • Pencil | A laser level is a game-changer for getting your first panel perfect. A stud finder is non-negotiable. |
| Cutting | • Miter Saw • Jigsaw | • Miter Saw: This is the best tool for clean, straight, 90-degree cuts. Use a fine-toothed blade (80-tooth or higher) for a chip-free cut. • Jigsaw: You will need this for cutting around outlets. Use a fine-finish wood blade. |
| Fixing | • Caulking Gun • Construction Adhesive • Brad Nailer (18-gauge) | • Adhesive: Use a high-quality brand like Loctite PL Premium. • Nailer: A brad nailer is highly recommended. It is much faster and cleaner than a hammer and nails. You can rent one if you do not own one. |
| Safety | • Safety Glasses • Gloves | Always wear eye protection when cutting. |
How Do You Calculate How Many Panels You Need?
To calculate your panels, measure the total width of your wall. Divide this by the "coverage width" of one panel.
This is the number one mistake I see beginners make. They use the total panel width. You must use the coverage width. This is the width of the panel after it has interlocked with another.
- Example Calculation:
- Your wall is 144 inches wide.
- You buy a panel that is 6 inches wide, but its coverage width is 5.5 inches.
- Calculation: 144 inches (Wall) / 5.5 inches (Coverage) = 26.18 panels.
- You must round up. You need 27 panels for this wall.
- The 10% Waste Rule: Always buy 10% extra panels. This covers you for any mis-cuts, mistakes, or a damaged panel you find in a box. It is a cheap insurance policy. Planning this is a key part of figuring out the total cost of WPC wall panels.
Do You Need to Acclimate Your WPC Panels?
Yes. You absolutely must acclimate your WPC panels. Lay the unopened boxes flat in the room where they will be installed for at least 48 hours.8
- Why this is critical: WPC is a "composite."9 It will expand or contract slightly to match the room's temperature and humidity. If you bring panels from a cold garage and install them in a warm, humid house, they will expand after installation. This can cause them to buckle or warp.
- My Experience: I was once called to fix a job where the seams were opening up. The installer had stored the panels in his truck overnight in the winter. He installed them cold. When the heat came on, the panels shrank, and visible gaps appeared. Do not skip this step.
What Are Battens? (And Do You Need Them?)
Battens are strips of wood (like 1x3 furring strips) that you attach to the wall first. You then install the WPC panels onto the battens.
You must use battens if you are installing over:
- Brick
- Concrete
- Crumbling Plaster
- Very uneven drywall
For a standard drywall installation, battens are optional. However, they have two benefits:
- Easy Wire Hiding: They create a 3/4-inch gap behind the panels, perfect for running speaker wire or LED cables.
- Insulation: This gap is also the perfect place to add rigid foam. This is a great feature if you are using WPC wall panels with insulation on an exterior wall.
If you use battens, install them horizontally (perpendicular to your vertical panels), spaced every 16-24 inches. Screw them directly into the wall studs.
Step 2: The Installation Process (Direct-to-Drywall Method)
This is the most common installation method. We will walk through it step by step.
Step 2A: Find and Mark Your Studs
Use your stud finder to locate every wall stud. Mark the center of each stud with a pencil line from the floor to the ceiling.
Why? Even though you are using adhesive, your fasteners (nails or screws) provide the "clamping" force while the glue cures. They must go into solid wood. Nailing into hollow drywall does nothing.
Step 2B: Plan Your Layout and First Panel
Do not just start in a corner and hope for the best. Plan your layout to avoid a tiny, awkward-looking sliver of a panel on the other end.
- The Balanced Layout (Pro-Tip):
- Measure your total wall width (e.g., 122 inches).
- Divide by your panel's coverage width (e.g., 6 inches).
- 122 / 6 = 20.33. This means you will have 20 full panels and a final piece that is only 0.33 x 6 = ~2 inches wide. This will look like a mistake.
- The Fix: "Balance" the wall. Instead of starting with a full panel, cut your first panel. In this case, you have 2 inches of "leftover." Divide that by 2.
- You will start with a 1-inch piece, and you will end with a 1-inch piece. (Or, more simply, take that 2-inch sliver and add it to a full 6-inch panel = 8 inches. Divide by 2. You will start and end with a 4-inch panel).
- This balanced layout looks intentional and professional.
Step 2C: Cut and Prepare the First Panel
Your first panel is the most important piece of the entire project. It must be perfectly vertical.
- Measure Height: Measure the height of your wall in three places (left, middle, right). Walls are rarely perfect. Use the shortest measurement and cut your first panel to that length. A miter saw will give you a perfect 90-degree cut.
- Prepare the Edge: You will likely start in a corner. Most systems require you to cut off the "tongue" or "groove" flange on the side of the panel that will sit in the corner. This allows it to sit flat. Check your product's specific instructions.
Step 2D: Fix the First Panel (The Most Critical Step)
Apply a generous bead of construction adhesive to the back of the panel. A thick, wavy "S" pattern works best.
- Press the panel into the corner.
- Now, take your 4-foot level and place it against the exposed (interlocking) edge.
- THIS IS THE MOMENT THAT MATTERS. Do not trust your corner to be plumb (perfectly vertical). It is not. I have never, in hundreds of jobs, found a perfect corner.
- Adjust the panel until the bubble on your level is perfectly in the middle. This is your "plumb line."
- Once it is perfect, fire a brad nail through the face of the panel near the corner (this will be hidden by caulk or trim).
- Then, drive brad nails through the exposed tongue at an angle, into the wall studs you marked. This is the "hidden fastening" technique. The next panel will cover these nails.
Step 2E: Install the Following Panels (The "Rhythm")
This is the fun part. You will get into a fast rhythm.
- Glue: Run a bead of adhesive on the back of the next panel.10
- Slide: Firmly slide the groove of the new panel onto the tongue of the installed panel. Make sure it seats fully. You may need to tap it gently with your hand or a rubber mallet.
- Nail: Drive brad nails through the exposed tongue of the new panel, into each stud.
- Wipe: Keep a rag and mineral spirits handy. Wipe up any adhesive that squeezes out immediately. Once it dries, it is very difficult to remove.
- Repeat this process (Glue, Slide, Nail, Wipe) across the wall.
Step 3: How to Handle Cuts and Obstacles
Your wall is not a blank rectangle. You will have to deal with outlets, corners, and the end of the wall. This is what separates a DIY look from a pro look.
How Do You Cut Around Outlets and Light Switches?
You must cut a hole in your panel before you install it.
- Measure Carefully: Install the panel below the outlet. Then, measure from the top of that panel to the bottom of the outlet box. Measure from the edge of the last installed panel to the left and right sides of the box.
- Transfer: Transfer these four measurements to your new panel. Draw the rectangle.
- Check: Hold the panel up to the wall (before gluing) to double-check your marks. "Measure twice, cut once" is a law here.
- Cut: Drill a starter hole in each corner of your drawn rectangle. Use a jigsaw to cut out the hole.
- Finish with a Box Extender: This is a critical safety step. Your new panels add thickness to the wall. Your outlet will be recessed. You must buy a "box extender" from any hardware store. This plastic or metal ring brings your outlet forward so it sits flush with the new WPC surface.
How Do You Handle Inside and Outside Corners?
You have two options for corners: trim pieces or a mitered edge.
- Option 1 (Easiest & Recommended): Use matching trim. Nearly all WPC panel systems sell matching "L-trim" or "corner trim."
- Inside Corner: Install panels on both walls right into the corner. Then, simply glue the matching trim piece into the corner to cover the seam.
- Outside Corner: Install panels on one wall, letting them hang over the edge. Install the second wall's panels. Then, cover the corner with the matching "outside corner" trim.
- Option 2 (Pro-Level): A mitered edge. This involves cutting the edges of the two panels that meet at the corner at a 45-degree angle.11 This is very difficult to do on a fluted panel and requires a high-quality, precise miter saw. For 99% of DIYers, I strongly recommend using the matching trim.
How Do You Cut the Last Panel in a Row?
The last panel will almost never be a perfect fit. It will need to be cut lengthwise (a "rip cut").
- Measure the Gap: Measure the width of the remaining gap at the top, middle, and bottom of the wall. Walls are not straight.
- Transfer: Take the narrowest of your three measurements. Transfer this to your final panel.
- Cut: Use a table saw, circular saw (with a guide), or a jigsaw to cut the panel lengthwise.
- Install: Apply adhesive. You will have to "face-nail" this panel (nail through the front of it) near the edge. Place the nails where they will be covered by caulk or corner trim.
Step 4: Finishing Touches (The Pro Look)
A job is not done until it is trimmed out. This is what makes it look clean and professional.
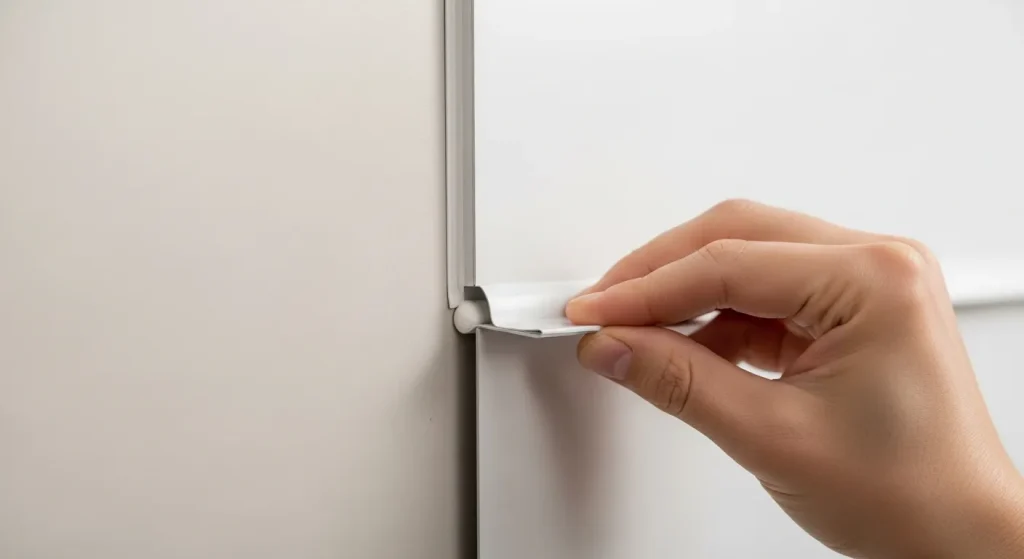
- Top and Bottom: If you removed your baseboards and crown molding, reinstall them now over the WPC panels. This is the cleanest look. If you left them on, run a bead of color-matched, paintable caulk along the seam where the WPC meets the trim.
- Side Edges: If your wall ends on a flat wall, you must use a "trim piece" (like an L-trim or end cap) to cover the exposed edge of the last panel. Glue and pin-nail this trim in place.
- Caulk: Caulk all your seams: where the panels meet the ceiling, baseboards, and side walls.12 Use a high-quality, flexible caulk. This hides any tiny imperfections and makes the installation look truly built-in.
What About Modular or Prefabricated WPC Systems?
The installation for modular WPC wall systems or prefabricated WPC wall panels can be slightly different.
- Clip Systems: Many modular systems use a metal track or special clips. You screw the track to the wall (into the studs). The panels then "click" into the clips. This is often faster and uses no adhesive.
- Prefab Panels: These are just very large WPC panels. The principles are the same, but the panels are heavier. This is a two-person job.
- The Golden Rule: Always, always read the specific instructions that come with your panels. My guide is a best-practice, universal method. But if your manufacturer specifies a certain clip or adhesive, follow their guide.


