


PVC Wall Panel Trimming and Finishing Techniques: Overview
Achieve a Seamless Look of PVC Wall Panels with Ease
Design specialists, as well as homeowners, have increasingly gravitated to the use of PVC wall panels due to their aesthetic appeal, durability, and ease of maintenance. They are economical as well, although obtaining the sleek finish requires meticulous consideration during the trimming and finishing phases. Rather meticulous attention to detail ensures moisture ingress resistance, along with the aesthetic appeal, which adds to the overall longevity of the wall panels. This guide seeks to provide insights into every step involved in trimming and finishing while listing tools required and offering professional maintenance tips so walls can be crafted to enhance beauty for years.
Why Moisture-Resistant Edges Matter: The Importance of Trimming?
PFC trims fulfill both functional and aesthetic requirements; however, panel trimming comes with its array of benefits. Trimmed edges serve an important purpose – blocking seepage alongside dirt or dust accumulation over time. Moreover, polished edges help in eliminating unsightly losses while retaining home decor seamlessness, elevating value greatly.
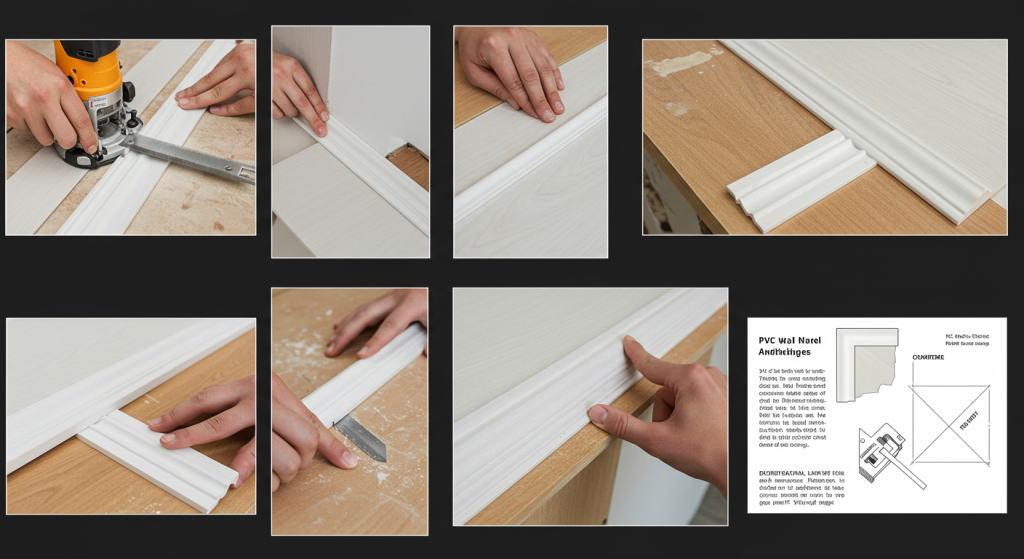
Tools You’ll Need to Get Started
Diving into trimming? Well, here is your checklist:
- Sawing devices like finely toothed saws or craft saws are essential for starting.
- A telescoping utility knife
- A circular drawing blade
- Measuring tools such as pencils and a tape measure
- Straight edges, T-squares, and sand blocks
- Fine sanding blocks for silky smooth putty polishing foam pads
- Silicone-based adhesives or glue made from PVC
- Powered glue applicators
Regardless of the names of these instruments, they all serve a single purpose, which is to help you minimize panel damage during work.
How to Trim PVC Wall Panels Properly Step-By-Step?
1. Measure All Accessible Areas with Precision
For precision marking, use delicate measuring tapes. Mark clear lines for cutting edges in order for cutting to be much easier. If dealing with intricate sections like pipes or outlets, consider sketching templates first, then tracing onto the panel for seamless cutting later on. Dimensional accuracy checks provide massive returns later, so always double-check.
2. Straight Cuts That are Clean and Smooth
Ensure no silhouette markings reach cut lines by placing the decorative side of the panel face up to make sure slow, sharp cuts form smooth rather than jagged tear cuts.
- Lanes require the areas under them to be smooth and flat without bending at 3. Smooth the Edges
- Sharpened surfaces can be rough to cut; however, finishing them with fine-grit sandpaper ensures that the sharp surface is fully polished. This not only aids in aesthetics but ensures that there is no discrepancy during the installation of the panel. Exercise caution while detailing burning windows or corners, as they are more critical.
Selecting Appropriate Trim for a Finished Appearance
Elegance on shutters comes from appropriate trimming, which makes them flush to the panels. Each serves its purpose;
- End Caps – Clean exposed ends
- Internal Corner Trim – For concave 90° angles
- External Corner Trim– Supplied where panels intersect outward-facing corners
- H-Trim: Connects two panels side by side with no step or seam.
- Bottom or Skirting Trim: Joins the panel to the floor seamlessly, creating a neat offset.
- Aside from protecting from leakage, trims also add to the aesthetic value of the wall.
Final Edges and Joints Sealing
- Silicone sealant caulk should be applied in a thin bead to all edges where joints merge with surfaces or trim borders, to finish off water ingress concerns within the structure. This is especially crucial for hotter areas like kitchens or bathrooms.
- These surfaces require additional attention; if working at external corners, remember to use corner beads for adding light rigidity while masking seams that provide sharp, refined lines framing rounded corners.
- Excess sealant becomes extremely problematic. While in most cases, trim clean excess preserves unblemished surfaces, make sure that during this step, you do not allow it to dry, so you can wipe away while damp.
Expert Tips for Finishing Touches
Self-documenting checklist whilst performing finishing tasks includes:
- Confirmation of alignment accuracy during work completion
- Clap glued panels together until bonds fully set to hold them till reinforcement.
- Filling gaps with trim instead of attempting panel recutting
- Covering silicone tape over surfaces prone to exposure to water
- Avoid cutting sealed edges directly, which would ruin the decoratively cut border.
These small steps will turn great results into extraordinary masterpieces.
Interesting Ideas for Using Leftover Trim
Have you trimmed PVC strips and kept them aside? Instead of throwing them out, they can be used as design accents. Here are some ideas for use:
- Combine different finishes for better color contrast.
- Use trim to backlight with LED strip lights for a gentle glow.
- Place trims in diagonal positions to create fresh shapes.
Although these suggestions might sound basic, they have great potential to elevate the look of your work professionally.
How to Care for the Look of Your Panels?
The wall PVC panels do not need too much attention when it comes to maintenance, but do require an element of care, even though there is no rigid criterion to follow, such as basic cleanliness.
- Wipe down regularly with warm water for optimal results.
- Do not use rough towels or sponges; deodorizing cleanse products also should be avoided.
- Check seals every six months to one year.
- Replace the sealant if any gaps are visible.
- Incorporating these actions will allow the average user effortless upkeep alongside maintaining that freshly installed look for years.
Flaws to Avoid
To help reduce the frustration process involved, attempt to steer clear of these mistakes:
- Overreaching on your cut
- Using dull blades results in rough edges.
- Skipping rounding off edges
- Leaving Space when joining two panels
- Adhesive Overuse or Underuse
These so-called 'flaws' contribute alongside other, more minor blunders to how clean the finish is, and how much wear and tear the item can withstand after being used.
Conclusion
Even though it might seem that trimming is of small importance, it is actually what integrates all the effort done before. Using correct tools and precise measurements permits achieving professional-looking results. HSCS offers sturdily fabricated panels effortlessly designed, seamlessly blending interiors with timeless elegance, enduring beauty, making any place enjoyable while inviting. Redistributing spaces one room at a time or several at once, explore our collection of flooring clients with effortless design supporting craftsmanship while inviting sophisticated style.


