


The Ultimate Guide to WPC Wall Panels: Design, Installation, and Benefits
WPC wall panels are a fantastic way to upgrade your space, blending the rich, visual warmth of wood with the resilience of modern composites. If you are looking for a wall covering that is durable, water-resistant, and stylish, WPC (Wood-Plastic Composite) is one of the best options available today. This guide covers everything from a simple definition to a full installation tutorial, giving you the confidence to use WPC for your next project.
We will explore the specific benefits, compare WPC to other materials like PVC and wood, and walk through the installation process step-by-step. Whether you're planning a feature wall, a bathroom renovation, or an exterior update, you'll find the answers here.
What Are WPC Wall Panels?
WPC wall panels are durable, decorative boards used for covering interior or exterior walls. They are made from a "Wood-Plastic Composite" (WPC), which is a mix of recycled wood fibers (like sawdust) and plastic resins (like PVC or PE). This hybrid material creates a panel that looks like natural wood but is far more durable.
Think of WPC as the best of both worlds. You get the classic, timeless look of timber, but you avoid all its common problems. Because the wood fibers are fully encased in plastic resin, the panels are resistant to moisture, rot, and insects. This makes them a practical choice for almost any room in a building, including high-humidity areas. For a deeper dive into the composition, see our full guide on what are WPC wall panels.
How Are WPC Panels Made?
WPC panels are manufactured by thoroughly blending heated thermoplastic resins with wood fibers and special additives. This mixture is then extruded, or forced, through a mold to create specific panel shapes (like fluted or tongue-and-groove profiles). It is then cooled and cut to its final size.
The manufacturing process is key to the panel's performance.
- Mixing: Fine wood fibers, recycled plastics, and binding agents are mixed in a high-temperature chamber.
- Extrusion: This hot composite "dough" is pushed through a custom-shaped die. This is what creates the fluted, slatted, or flat profiles.
- Finishing: The panels are cooled. A top layer, or "cap," is often applied. This cap can be a layer of laminate or a protective polymer shell that contains the color, texture (like wood grain), and UV inhibitors.
This co-extrusion method is what gives the panels their signature strength and finished look straight out of the box.
What Are the Main Benefits of WPC Wall Panels?
The primary benefits of WPC wall panels are their exceptional durability, high water resistance, and low maintenance needs. They do not rot, warp, or attract pests like traditional wood. They also offer excellent acoustic properties, are easy to install, and come in a wide range of stylish designs.
Let's break down those advantages in more detail. When you choose WPC, you are choosing a material that solves common homeowner headaches.
- Superior Durability: The composite material resists scratches, impacts, and fading far better than painted drywall or wood siding.
- Waterproof Quality: This is a game-changer. The plastic resin makes the panels impermeable to moisture.
- Low Maintenance: Forget sanding, staining, or painting. WPC panels only need an occasional wipe-down with a damp cloth.
- Pest Resistance: Termites and other wood-boring insects have no interest in WPC.
- Easy Installation: Most panels use a tongue-and-groove system, making them a popular choice for DIY projects.
We explore these points and more in our detailed article on the benefits of WPC wall panels.
Are WPC Wall Panels Really Waterproof and Durable?
Yes, WPC wall panels are 100% waterproof. The plastic composite material does not absorb water, making it impossible to rot, swell, or grow mold from moisture. This quality also makes them extremely durable, as they are protected from the water damage that degrades most other wall coverings.
This is the single biggest selling point for WPC. Unlike "water-resistant" materials (like MDF or laminate), which can handle a small splash, WPC is completely waterproof. The core itself is inert to water.
This makes it a perfect solution for:
- Bathrooms and shower areas
- Laundry rooms
- Basements
- Kitchen backsplashes
- Exterior cladding in rainy climates
You can install them with confidence, knowing that steam from a hot shower or a splash from the sink will have no negative effect. This permanent protection is why WPC wall panels' waterproof and durable nature makes them a superior investment.
Do WPC Panels Offer Insulation?
Yes, WPC wall panels provide both thermal and acoustic insulation. The composite material's core structure helps to slow the transfer of heat, keeping a room warmer in winter and cooler in summer. It also absorbs sound waves, which can reduce echo and dampen noise between rooms.
While not a replacement for dedicated foam insulation, the insulating properties of WPC are a significant bonus.
- Thermal Insulation: The wood fibers and polymer core have a lower thermal conductivity than materials like tile or plaster. This can help improve your home's energy efficiency.
- Acoustic Insulation: This is a huge benefit for home theaters, bedrooms, or offices. The density and structure of WPC panels (especially fluted designs) break up and absorb sound waves. This makes the room feel quieter and more comfortable.
If you are looking for a solution that combines style with functional benefits, WPC wall panels with insulation properties are a smart choice.
WPC vs. PVC Wall Panels: What's the Difference?
The main difference is their core. WPC (Wood-Plastic Composite) panels have a core made of wood fibers and plastic, making them feel sturdy, rigid, and more like real wood. PVC (Polyvinyl Chloride) panels are 100% plastic, making them lighter, more flexible, and typically less expensive.
Choosing between them depends on your budget and application. WPC is generally seen as the more premium, durable option. Its solid core provides better dent resistance and a more "solid" feel on the wall.
PVC panels are a great budget-friendly, waterproof option. But, they can sometimes feel more "hollow" and may show dents or damage more easily. For a full breakdown, check our direct comparison: WPC vs. PVC Wall Panels.
Here is a simple comparison:
| Feature | WPC Wall Panels | PVC Wall Panels |
| Core Material | Wood Fiber + Plastic Resin | 100% Plastic Resin (PVC) |
| Feel & Strength | Solid, rigid, high-density | Lightweight, flexible, often hollow |
| Aesthetics | Excellent at mimicking wood | Good, but can look more "plastic" |
| Durability | High impact resistance | Prone to denting or cracking |
| Cost | Mid-range to High | Low to Mid-range |
| Best For | Feature walls, high-traffic areas | Budget renovations, ceilings |
How Does WPC Compare to Natural Wood?
WPC panels offer the aesthetic of natural wood without the high maintenance. Wood requires regular sealing, is prone to water damage, and can be attacked by pests. WPC is 100% waterproof, requires no sealing, and is pest-proof, making it a more durable and practical alternative.
We all love the look of real wood, but it's not practical for every situation. Wood is a "living" material; it expands and contracts with humidity. It stains easily. It requires a lot of upkeep.
WPC was invented to solve these exact problems. You get a consistent, beautiful finish that is stable and protected. It will look the same in ten years as it did the day you installed it, with virtually no effort. For a project in a bathroom, basement, or even outdoors, WPC is the clear winner over natural wood.
Can a Beginner Install WPC Wall Panels?
Yes, absolutely. WPC wall panels are designed to be DIY-friendly. Most systems use a simple tongue-and-groove or click-lock mechanism. With basic tools and some careful measurement, a beginner can achieve a professional-looking finish, often in just a weekend.
This is one of the project's biggest draws. Unlike tiling, which requires messy mortar and grout, or drywall, which requires taping and sanding, WPC panels are a clean and fast installation.
Our guide on how to install WPC wall panels provides a great overview, but we'll walk through the key steps below.
What Tools and Materials Will I Need?
For a standard WPC panel installation, you will need a tape measure, a level, a pencil, a fine-toothed saw (like a miter saw or handsaw), and a construction-grade adhesive or screws. You may also want a utility knife and safety glasses.
Here is a complete checklist to take to the hardware store:
- Measuring: Tape Measure, Spirit Level (a laser level is even better), Pencil
- Cutting: Miter Saw (best for clean cuts), Jigsaw (for outlets), or a Fine-Toothed Hand Saw
- Fastening: High-grab Construction Adhesive, Silicone Sealant (for bathrooms), Brad Nailer (optional), or Screws (if specified)
- Safety: Safety Glasses, Gloves
- Finishing: Matching Trim Pieces (for corners and edges)
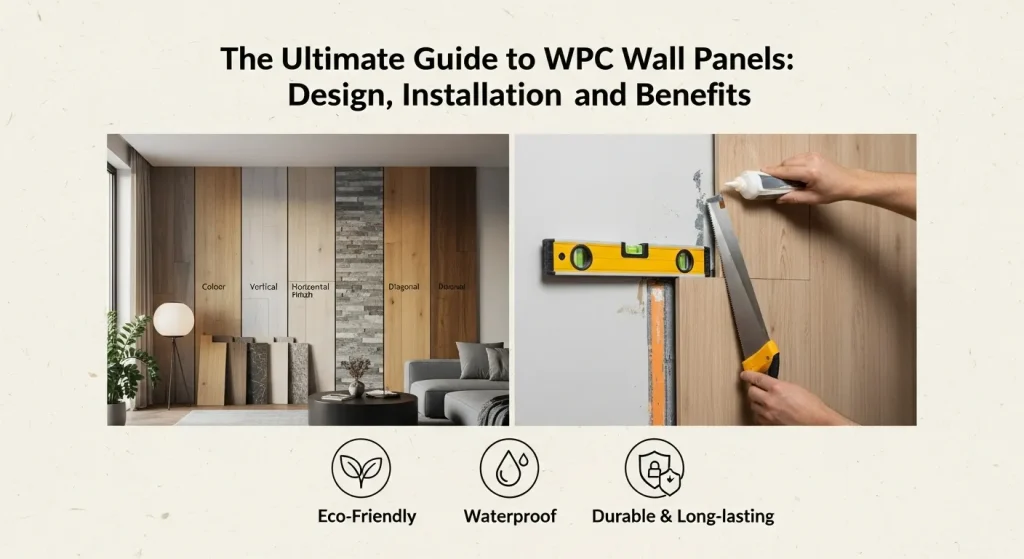
Step-by-Step Installation Guide
Step 1: Prepare Your Wall
Your wall surface must be clean, dry, and reasonably flat. Remove any loose wallpaper, flaking paint, or debris. WPC panels can be installed over drywall, plaster, or even existing tile, as long as the surface is stable.
Here's a pro-tip from personal experience: Check your wall for level. My first time installing WPC, I assumed the corner of the room was a perfect 90 degrees. It wasn't. I had to pull the first three panels off and shim the wall. Use your level to draw a perfectly vertical (plumb) line where your first panel will go. Trust this line, not your wall's corner.
Step 2: Measure and Cut Your Panels
Measure the height of your wall from floor to ceiling. Transfer this measurement to your WPC panel and mark a clear cutting line. Use a fine-toothed saw for a clean, sharp cut. If cutting for outlets, measure their position, mark a box, and use a jigsaw.
Always "measure twice, cut once." When cutting with a miter saw or circular saw, have the "finished" side of the panel facing up or down, depending on your saw type, to prevent chipping. For a hand saw, a slow, steady motion works best. It's smart to cut your first panel and test-fit it before cutting the rest.
Step 3: Apply Adhesive and Fix the First Panel
Apply a generous amount of construction adhesive in a "snake" or "S" pattern on the back of the panel. Press the panel firmly against the wall, aligning it with your level line. If using nails or screws, fasten them through the "tongue" or hidden flange.
The first panel is the most important. If it's perfectly level, the rest of the wall will be easy. Press it into the adhesive and hold for 30-60 seconds. Use your level one last time to make sure it's perfect before moving on. Some installers like to shoot a few brad nails through the tongue (the hidden part) to hold it in place while the glue dries.
Step 4: Install the Remaining Panels
Take your next panel and apply adhesive. Firmly push the "groove" of the new panel onto the "tongue" of the first panel. You should get a tight, seamless fit. Repeat this process across the entire wall, wiping away any excess adhesive as you go.
This part of the process is fast and very satisfying. The panels will lock together neatly. Give each panel a firm tap with your hand to ensure it's fully seated before moving to the next.
Step 5: Finish with Trim
Once all panels are installed, cover the exposed edges, corners, and joints at the floor or ceiling. Use matching WPC trim pieces, applying them with a small bead of adhesive or brad nails for a clean, professional finish.
Trim is what separates a "DIY" look from a "professional" look. Corner trims hide imperfections where two walls meet. Skirting or ceiling trims create a clean boundary. This final step ties the whole project together.
What Are Some Modern WPC Wall Cladding Ideas?
Popular WPC cladding ideas include creating a "fluted" or "slatted" media wall behind a TV, designing a vertical half-wall in a dining room, or using wood-grain panels as a waterproof feature wall in a bathroom. Outdoors, WPC cladding is popular for modernizing building exteriors.
WPC has moved far beyond basic flat panels. The biggest trend right now is "fluted" or "slatted" panels. These 3D panels create a stunning, architectural effect with shadow and light.
Here are a few modern WPC wall cladding ideas to get you started:
- Media Wall: A fluted WPC panel wall is the most popular way to frame a wall-mounted TV.
- Bedroom Headboard: Install panels vertically behind your bed to create a stunning, built-in headboard.
- Bathroom Feature: Use a dark wood-grain WPC panel on the wall behind your vanity or bathtub.
- Ceiling Inset: Run panels on a section of your ceiling for an ultra-modern, high-end design.
How Much Do WPC Wall Panels Cost?
The cost of WPC wall panels varies based on quality, thickness, and design. On average, you can expect prices to range from $8 to $20 per square foot. While this is more than a can of paint, it is often cheaper than custom millwork or installing and finishing natural wood.
Several factors influence the final price:
- Profile: Fluted and 3D designs often cost more than flat panels.
- Finish: A high-definition, textured wood grain will be more expensive than a simple, solid color.
- Brand: Premium brands may have better warranties and UV-protection.
- Exterior vs. Interior: Exterior-grade panels are built to withstand weather and cost more.
When budgeting, remember that WPC is a "one-and-done" cost. There is no recurring expense for staining or repainting. This makes the cost of WPC wall panels a great long-term value.
What Are Modular and Prefabricated WPC Systems?
Modular and prefabricated WPC systems are larger, pre-assembled sections of wall. Instead of installing individual planks, a modular WPC wall system allows you to cover a large area quickly. Prefabricated WPC wall panels are often used in new construction to speed up the building process.
These systems are more common in commercial or large-scale residential projects. A "modular" system might include panels, built-in supports, and trim all in one kit. "Prefabricated" panels are built off-site and delivered ready to be attached to the building's frame. For most home DIY projects, you will be working with the standard tongue-and-groove planks, but it's good to know these larger-scale options exist.
How Do You Clean WPC Wall Panels?
Cleaning WPC wall panels is simple. For interior walls, use a soft cloth or a duster for regular cleaning. For scuffs or dirt, wipe the panel with a damp cloth and a mild soap-and-water solution. Avoid using abrasive cleaners or scouring pads.
Can You Paint WPC Wall Panels?
It is generally not recommended to paint WPC panels. The non-porous plastic surface is designed to resist adhesion, so paint will not bond well and will likely peel or chip over time. The factory finish is designed to be the permanent, final surface.
If you absolutely must change the color, you would need to heavily sand the surface to create a "key" and then use a specialized primer designed for plastics. But, this will void any warranty and is not a reliable solution. It is far better to choose a color and finish you are happy with for the long term.
Will WPC Panels Fade in Sunlight?
Most high-quality WPC panels are co-extruded with a protective "cap" that contains UV inhibitors. This outer layer is designed to protect the panel from fading and is why WPC is a popular choice for exterior siding. Cheaper, uncapped panels may experience some fading over many years.
This is a key quality point to check with your supplier. Ask if the panels are "capped" or "co-extruded." This UV-protected layer is critical, especially if you are installing the panels in a room with a large, south-facing window or for an outdoor application.
Are WPC Wall Panels the Right Choice for Your Project?
If you are looking for a wall covering that is waterproof, low-maintenance, easy to install, and provides a modern, stylish look, then WPC wall panels are an excellent choice. They are a practical and beautiful upgrade for almost any room in your home.
WPC wall panels have successfully solved the biggest problems of traditional wood. They give you the visual impact you want without the maintenance headaches you don't.
From a fluted TV wall in your living room to a 100% waterproof solution for your shower, this versatile material is one of the most practical and transformative products in modern interior design. With a simple weekend installation, you can add value, style, and durability to your space that will last for decades.


