


How to Install Wooden Wall Panels for Interiors
Learning how to install wooden wall panels for interiors is a project that can completely change a room. It adds warmth, character, and a high-end feel. A wood panel wall can be a modern wood slat wall design or a classic, cozy covering.
This is a job you can do yourself. But, unlike painting, it requires patience and a good plan. Wood is a natural material that moves, so the installation process is about managing that movement.
I have installed these panels for years. I have also been called in to fix installations that went wrong. The number one mistake is always impatience. This guide is built from that experience. We will cover the pro-tips, the common mistakes, and a full step-by-step process.
What Are Wooden Wall Panels?
Wooden wall panels are decorative boards used to cover interior walls.2 They come in solid wood, engineered, or fiber types. They add warmth, texture, and acoustic value.3 Panels are often used for feature walls and are installed with glue, nails, or a clip system.
These panels are more than just a wall covering. They are an architectural feature. They range from thin, bamboo wooden wall panels to thick, solid wood acoustic slat panels. The type you choose will define the installation method.
Why Choose Wooden Panels for Your Renovation?
Wooden panels add instant texture, warmth, and a feeling of quality.4 They are also a fantastic way to hide a damaged or imperfect wall. Unlike drywall, they offer great sound-dampening benefits, making a room feel quieter and more comfortable.5
The benefits are more than just looks.
- Aesthetic Value: Wood has a natural, timeless beauty.6 It can make a room feel cozier or more modern.
- Hides Imperfections: Do you have wavy plaster or old, patched drywall? A wood panel system (especially on furring strips) can cover it completely.
- Acoustic Benefits: Wood is a dense, natural material.7 It absorbs and breaks up sound waves. This is why solid wood acoustic slat panels are so popular for media rooms and offices.
- Increases Home Value: A well-done wood feature wall is a high-end upgrade that adds to your home's resale value.8
What Are the Main Types of Wooden Panels?
The type of panel you choose is the biggest factor in your installation. A heavy, solid wood plank is installed very differently from a lightweight, engineered panel.
Solid Wood / Timber Panels
These are just what they sound like: solid planks of hardwood or softwood. This is the premium, traditional choice. They offer the most authentic look and feel. They also expand and contract the most with humidity, so acclimatization is critical.
Engineered Wood Panels (Veneer/MDF)
These panels have a thin, real-wood veneer over a stable core (like MDF, HDF, or plywood).9 They are a great choice because the engineered core is very stable. It is less likely to warp or bow. This is a common choice for modern wood slat wall design.
Bamboo Panels
Bamboo is a grass, not a tree, but it is one of the hardest and most stable "wood" products available.10 Bamboo wooden wall panels are eco-friendly, very durable, and have a beautiful, unique grain. They are installed just like solid wood.
Wood Fiber Decorative Panels
These are often 3D, textured, or "fluted" panels. They are made from compressed wood fiber decorative panels (like MDF) and are designed to be painted. They are lightweight and easy to install, but they are not as durable as solid wood.
A timber vs engineered wood slats comparison often comes down to this: solid timber is for "character," while engineered is for "stability."
What Are the Main Installation Methods?
There are three main ways to attach panels to your wall. The method you choose depends on your panel type, your wall's condition, and your tools.
Method 1: Adhesive (Glue-On)
This is the simplest method. You apply a high-strength construction adhesive directly to the back of the panel and press it to the wall. This is fast and requires no special tools. It is best for lightweight, engineered, or wood fiber decorative panels.
Method 2: Nail-In (Face or Hidden)
This involves nailing the panels to the wall (into the studs).11 You can "face-nail" (nails are visible) or "hidden-nail" (nails go through the tongue). This is a strong, secure method, perfect for heavy, solid wood planks. A brad nailer is your best friend here.
Method 3: Furring Strips (The "Pro" Method)
This is the best method for basements, concrete walls, or any wall that is wavy and uneven. You attach wood "furring strips" (1x3s) to the wall first, creating a flat, level frame. Then you attach your panels to the strips.
Here is a quick comparison:
| Method | Best For | Pros | Cons |
| Adhesive | Lightweight panels, flat drywall | Fast, easy, no nail holes | Will not work on uneven walls |
| Nail-In | Solid wood, tongue & groove | Very strong, secure | Slower, requires a nail gun |
| Furring Strips | Uneven walls, concrete, basements | Creates a perfect, flat wall | Most complex, takes more time |
Can a Beginner Install Wooden Wall Panels?
Yes. This is a "medium" difficulty DIY project. It is more complex than painting a room, but it is easier than tiling a shower. If you are patient, can measure accurately, and have (or can rent) a miter saw, you can get a professional result.
Your success as a beginner will come from two things:
- Patience: Taking the time to acclimatize the wood.
- Precision: Taking the time to level your first panel.
If you get those two things right, the rest of the job is just a simple, repetitive process.
What Tools and Materials Will I Need?
Having the right tools is 90% of the battle. Do not try to cut solid wood planks with a hand saw. It will be a disaster.
Essential Tools
- Tape Measure: Your most-used tool.
- Level: A 4-foot level is best. A laser level is even better.
- Miter Saw: This is almost non-negotiable for clean, angled cuts.
- Jigsaw: For cutting around outlets and light switches.
- Stud Finder: This is critical. You must know where your studs are.
- Chalk Line: For marking a long, straight line.
- Nail Gun (Brad Nailer): If you are using the nail-in method, this is a must.
- Caulk Gun: For applying adhesive.12
- Safety Glasses: Always.
Essential Materials
- Your Panels: Buy 10-15% more than your wall's square footage. This "waste factor" covers mistakes and cuts.
- Construction Adhesive: (If using) Get a high-strength, panel-specific brand.
- Brad Nails: (If using) 1.5 to 2-inch nails are standard.
- Furring Strips: (If using) 1x3 lumber is perfect.
- Shims: For leveling the furring strips.
- Matching Trim: To finish the edges.
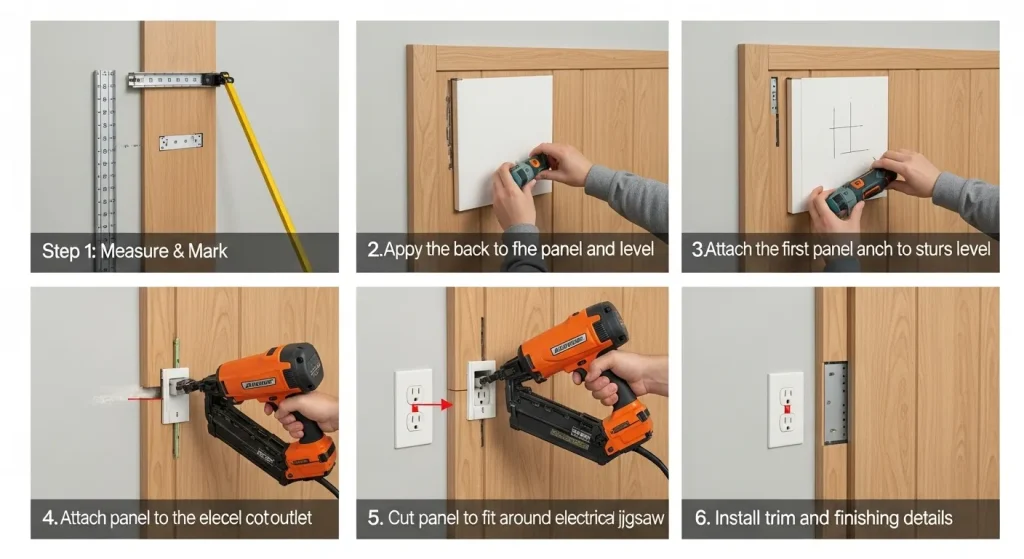
Step-by-Step Guide: How to Install Wooden Wall Panels
This is a complete, "no-secrets" guide. We will use the most professional method (furring strips) as our example, as it includes all the steps. You can skip the furring strip step if you have a perfect, flat drywall wall.
Step 1: Acclimatize Your Panels (The Most Critical Step)
You must let your panels sit in the room for at least 72 hours before you install them. Do not skip this. Wood is a natural material that "breathes." It will absorb or release moisture to match the room it is in.
They skipped the 72-hour acclimatization. The dry wood from the warehouse absorbed the home's humidity and expanded. Since the panels were nailed tight, they had nowhere to go but out. We had to rip the whole wall out.
Do not be like them. Lay the panels flat in the room (not in the garage) for 3 full days.
Step 2: Prepare Your Wall
Your wall must be clean, dry, and sound.
- Clear the Wall: Remove all art, shelves, and furniture.
- Remove Baseboards & Trim: Use a pry bar to gently remove the baseboards and any crown molding. You will re-install them later.
- Turn Off Power: Turn off the power at the breaker to any outlets or switches on the wall. Remove the cover plates.
Step 3: Find and Mark Your Studs
You must attach your panels (or furring strips) to the solid framing of your house.
- Use your stud finder to locate every stud.
- Mark each stud with a pencil.
- Use your level to draw a light vertical line from floor to ceiling over each stud. This gives you a clear "nailing" target.
Step 4: Plan Your Layout (Measure Twice, Cut Once)
Do not just start in a corner and hope for the best.
- Measure the Wall: Get the total width and height.13
- Plan Your Start: If you start in a corner, your last panel might be a tiny, awkward sliver.
- The "Center-Out" Method: For a high-end look, find the center of your wall. Draw a plumb (perfectly vertical) line. You will start your first panels on either side of this line. This ensures your first and last panels are the same width, which looks balanced.
Step 5: (If Needed) Install Furring Strips
This step is for uneven walls, concrete walls, or if you want an air gap.
- Run your 1x3 furring strips horizontally across the wall.
- Attach them to the studs you marked using 2.5-inch screws.
- Place one strip near the floor, one near the ceiling, and one every 16-24 inches in between.
- Pro-Tip: This is where you fix a wavy wall. As you attach a strip, hold your level against it. If there is a "dip" in the wall, slide thin wood shims behind the strip before you drive the screw. This will make your new "frame" perfectly flat, even if the wall behind it is a mess.
Step 6: Cut Your Panels
This is where your miter saw is your hero.
- Measure the height of your wall. Transfer this measurement to your first panel.
- Pro-Tip: Wood can splinter when cut.14 To get a perfect, factory-clean edge, lay a strip of painter's tape over your cut line. The tape holds the top wood fibers in place. Cut through the tape. When you peel it off, you will have a perfect, splinter-free cut.
- You will repeat this for every panel.
Step 7: Install the First Panel (The "Level" Panel)
This is the second most-critical step. Your first panel sets the "plumb" for the entire wall. If it is crooked, every other panel will be crooked.
- Take your first panel.
- Place it against your starting line (either the corner or your center-line).
- Hold your 4-foot level against the side.
- Adjust the panel until the bubble is perfectly in the middle.
- Once it is perfect, attach it.
Step 8: Apply Adhesive and/or Nails
How you attach it depends on your method.
- Furring Strip Method: You do not need glue. Use your brad nailer.
- "Hidden Nailing": If your panels are tongue-and-groove, fire a nail through the tongue at a 45-degree angle.15 The next panel's groove will hide the nail. This is the pro method.
- "Face Nailing": If you must, you can nail through the face of the panel. Do this in a discreet spot.
- Adhesive-Only Method: Apply a "S" shaped bead of construction adhesive to the back of the panel. Press it to the wall and hold for 30-60 seconds.
Step 9: Install the Remaining Panels
This is the fast, fun part.
- Take your next panel.
- Lock its groove into the tongue of the first panel.
- Check for level again.
- Nail it (or press it) into place.
- Repeat.Pro-Tip: Check for level every 3 or 4 panels. It is easy to "drift." A small adjustment is easy. Fixing a big "lean" at the end is impossible.
Step 10: Cut Around Outlets and Switches
You will eventually hit an outlet.
- Hold your next panel up to the wall.
- Mark the top, bottom, and sides of the outlet box onto the panel.
- Use your jigsaw to cut inside your lines.
- Test the fit. It is better to cut too little and "shave" it down than to cut too much.
- You will need an "outlet box extender" to bring your outlet flush with the new, thicker wall.16 You can get these at any hardware store.
Step 11: Install the Trim
Your wall is up, but the edges look rough.
- Re-install your baseboards and any crown molding.
- Use matching "quarter-round" or "corner" trim to hide the expansion gaps in the corners.
- This trim is what gives the project a finished, professional look.
How Does This Compare to WPC Installation?
The method is similar, but the materials are different. A wood vs wpc wall cladding choice is about location. WPC (Wood-Plastic Composite) is a waterproof, synthetic material.17 It is lighter and does not expand. It is better for a high-moisture area like a bathroom. Wood is for adding natural warmth and character to "dry" interior spaces.18
How Do You Maintain Wooden Panels After Installation?
This is the easiest part. Wooden panels are much easier to care for than painted drywall. You can read a full guide on how to maintain bamboo wood wall panels, and the rules are the same.
- DO: Dust regularly with a dry microfiber cloth.19
- DO: Use a vacuum with a soft brush attachment.20
- DO NOT: Use harsh, wet, or abrasive cleaners.
- DO NOT: Use a steam cleaner.
Are Wooden Wall Panels a Good Choice for Your Home?
Yes. They are one of the best wooden wall panels and a fantastic way to add lasting value and beauty. They are a timeless upgrade that will never go out of style.
Installing them is a rewarding, medium-difficulty project. If you are patient, and you respect the material (especially acclimatization!), you can get a result that looks like it was done by a master carpenter.


